Lesson 1: Straight and Level Flight
How the Airplane Remains Airborne
We often use mechanical equipment without completely understanding how it works.
As a young bachelor, my parents gave me a vacuum cleaner for my birthday. Several months later, Mom called and asked, “Are you having trouble finding bags for your vacuum cleaner?” I said, “Bags? What bags?”
How was I to know the thing needed bags?
Technological ignorance has its advantages, but not when you’re up in the air. You don’t need a Ph.D. in aerodynamics to be a pilot, but a moderate-to-decent understanding of why an airplane stays airborne will prove helpful and life-sustaining. That’s why this first ground school class is the longest. Don’t worry; you won’t need to have your eyeballs recapped after reading it. But I do want you to read it all the way through. In order to fly a plane, you must first fill your brain (with a little bit of information, at least). This class is the place to start. Read, and be happy because this is an investment that will pay off big-time.
目次
May the Four Forces Be With You
No, the four forces isn’t a 1960s rock group. These forces are actually the things that pull and push on an airplane in flight. The four forces—lift, weight, thrust, and drag—are present any and every time a plane is airborne. Look at Figure 1-1, which shows the action of the four forces.

1-Lift, 2-Thrust, 3-Weight, and 4-Drag
Of course, enormous arrows don’t really protrude from the airplane. I know this will disappoint those of you who still expect the states to be colored blue and red and have lines drawn around their borders as you fly over them, but you’ll get used to it. The arrows do serve to show that what we’ve got here is a highly competitive new game—four-way tug-of-war. Your job as pilot is to manage the resources available in order to balance these forces. Let’s see what they’re all about.
Lift
Lift is the upward-acting force created when an airplane’s wings move through the air. Forward movement produces a slight difference in pressure between the wings’ upper and lower surfaces. This difference becomes lift. It’s lift that keeps an airplane airborne.
I discovered how lift works at four years of age during my first visit to church. The collection plate passed in front of me, and I picked out a few shiny items. My grandfather chased me around the pew, and I thought, “Wow, church is fun!” Picking me up by my sweater, Grandpa held me suspended four feet off the ground and toted me outside. It was the lift from Grandpa’s arm, precisely equaling my weight, that kept me airborne. Wings do for the airplane what Grandpa’s arm did for me—provide the lift to remain aloft.
Weight
Weight is the downward-acting force. It’s the one force pilots control to some extent by choosing how they load the airplane. With the exception of fuel burn, the airplane’s actual weight is difficult to change in flight. Once airborne, you should not be burning cargo or acquiring extra passengers (or losing them for that matter). Unexpected discharge of passengers while in flight is a violation of some FAA rule, so please don’t do it.
In unaccelerated flight (when the airplane’s speed and direction are constant), the opposing forces of lift and weight are in balance.
Thrust and Drag
Thrust is a forward-acting force produced by an engine-spun propeller. For the most part, the bigger the engine (meaning more horsepower), the greater the thrust produced and the faster the airplane can fly—up to a point. Forward movement always generates an aerodynamic penalty called drag. Drag pulls rearward on the airplane and is simply the atmosphere’s molecular resistance to motion through it. In plain English (which pilots and engineers rarely use), it’s wind resistance. Few things are free with Mother Nature. As a buddy of mine likes to say: “If you’re getting something for nothing, you’re not using your own credit card.”
Thrust causes the airplane to accelerate, but drag determines its final speed. As the airplane’s velocity increases, its drag also increases. Due to the perversity of nature, doubling the airplane’s speed actually quadruples the drag. Eventually, the rearward pull of drag equals the engine’s thrust, and a constant speed is attained.
My high school Volkswagen Beetle knew these limits well. The Bug’s forward speed is limited by its engine size. With four little cylinders (only three of which worked at any one time), this VW simply wouldn’t go faster than 65 mph. Figure 1-2 shows the results of maximum thrust meeting the equal and rearward pull of drag at this speed.
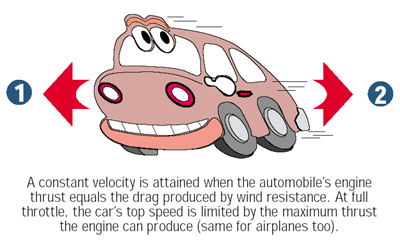
and 2-Drag,caused by resistance of air molecules
Maintaining a slower speed requires less power, since less drag exists. At any speed less than the maximum forward speed of the car, excess thrust (horsepower) is available for other uses, such as accelerating around other cars or perhaps powering a portable calliope if you are so inclined.
The same is true of airplanes. At less-than-maximum speed in level flight, there’s power (thrust) to spare. Excess thrust can be applied to perform one of aviation’s most important maneuvers—the climb.
With this introduction complete, I think it’s time for you to learn a little about the airplane’s flight controls.
Flight Controls
If you’re ready-made pilot material, you’ve been patiently licking your chops waiting for the discussion on flight controls. Gandhi would applaud your patience (but Gandhi isn’t here, so I will). Figure 1-3 shows the three imaginary axes of the airplane.
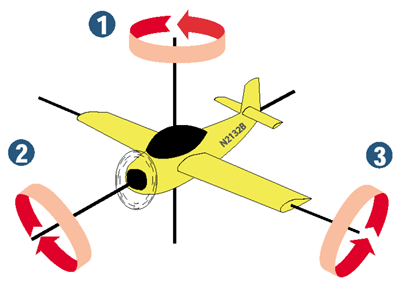
1-Vertical Axis (Yaw), 2-Longitudinal Axis (Roll), 3-Lateral Axis (pitch)
By use of the flight controls, the airplane can be made to rotate about one or more of these axes. The longitudinal, or long, axis runs through the centerline of the airplane from nose to tail. Airplanes roll, or bank, about their longitudinal axis. A good way to remember which way the longitudinal axis runs is to remember that it’s a long (as in longitudinal) way from the nose to the tail of an airplane.
A sideways pass in football is called a lateral pass. Similarly, the lateral axis runs sideways through the airplane from wingtip to wingtip. Airplanes pitch about their lateral axis.
The vertical axis of the airplane runs up and down from the cockpit to the belly. Airplanes yaw about their vertical axis. Think of yawing motion as yawning motion. In the morning, you yawn by standing and stretching vertically, rotating right and left, waiting for those vertebrae to kick in.
Now we’re ready to examine each of the three main flight controls that cause an airplane to move about its axes.
Ailerons
Ailerons are the moveable surfaces on the outer trailing edges of the wings. Their purpose is to bank the airplane in the direction you want to turn. When the control wheel is turned to the right, as shown in Figure 1-4, the ailerons simultaneously move in opposite directions (this doesn’t mean they’re broken, either).
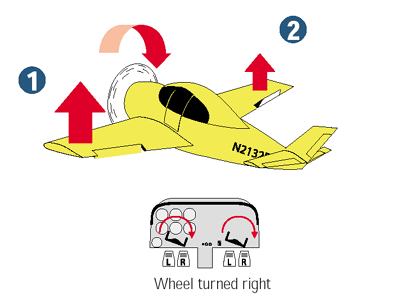
1-More lift with a lowered aileron, 2-Less lift with a raised aileron.
The left wing aileron lowers, increasing the lift on the left wing. The right wing aileron raises, decreasing the lift on the right wing. This causes the airplane to bank to the right.
When the control wheel is turned to the left, as shown in Figure 1-5, the left wing aileron raises, decreasing the lift on the left wing.
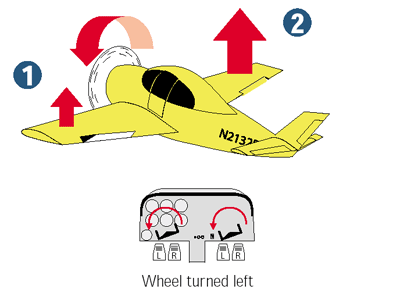
1-Less lift with a raised aileron. 2-More lift with a lowered aileron.
The right wing aileron lowers, increasing the lift on the right wing. This causes the airplane to bank to the left.
Ailerons allow one wing to develop more lift and the other to develop less. Differential lift banks the airplane, which tilts the total lifting force in the direction you want to turn.
Elevator
The elevator is the moveable horizontal surface at the rear of the airplane. Its purpose is to pitch the airplane’s nose up or down (Figure 1-6)
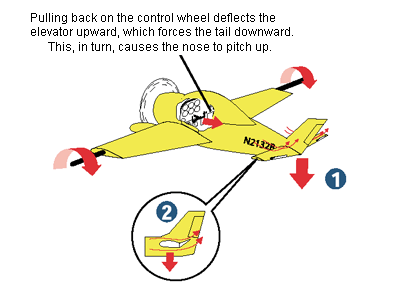
Tail moves down (1) because the elevator (2) moves up.
What the Heck is “Back Pressure?”
“Applying back pressure” is another one of those terms that sounds strange to non-pilots. It doesn’t mean you’ll be giving your instructor some sort of in-flight massage (as nice an idea as that may be). Rather, it refers to the action when a pilot pulls back—gently—on the airplane’s control wheel. The phrase probably came about as the result of an instructor who realized that novice students have a tendency to take the phrase “pull back on the wheel” a little too literally and yanked the wheel back hard… a maneuver I don’t recommend.
The elevator control works on the same aerodynamic principle as the aileron. Applying back pressure on the control wheel of the airplane, as shown in Figure 1-6, deflects the elevator surface upward.
Lower pressure is created on the underside of the tail, which moves it downward, and the nose of the airplane pitches up.
The airplane in Figure 1-7 shows what happens when the control wheel is moved forward.
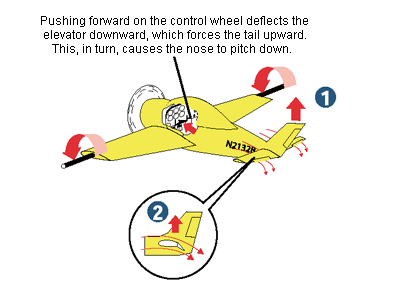
Tail moves up (1) because the elevator (2) moves down.
The elevator surface moves down, thus creating lower pressure on the top side of the tail and causes the tail to rise. The nose rotates about the lateral axis in a downward direction. Simply stated, to pitch up, pull the control wheel back; to pitch down, move the control wheel forward.
There’s also a third flight control, the rudder, which controls yaw around the vertical axis. We’ll discuss this later on, but for now, I want to make sure you know I didn’t forget about it.
Now that you’ve acquired a basic idea of how the flight controls work, let’s put our brain in the plane and discuss how to perform a useful flight maneuver: straight-and-level flight.
Straight-and-Level Flight
You’re about to practice straight-and-level flight, one of aviation’s most fundamental maneuvers. Does this sound like two separate maneuvers instead of one? Well, it is. Straight flight means the airplane’s nose remains pointed in one direction and the wings are parallel to the earth’s horizon. Level flight means the airplane doesn’t gain or lose altitude.
Figure 1-8 shows what straight-and-level flight looks like from the left seat where you, the pilot, normally sit.
Don’t worry if the picture shows us headed for a distant mountain. I’m with you, and I’m good at avoiding mountains. In fact, it’s my specialty.
How to Tell You’re Going Straight
Okay, how do you know you’re actually flying straight and level? The easiest way to tell is to look over the instrument panel and out the windscreen (the front window), as shown in Figure 1-8. It appears that the top portion of the instrument panel is approximately parallel with the earth’s distant horizon. This implies that your wings are not banked, which means you’re flying straight ahead and not turning.
There is, however, another way to tell if you’re flying straight. You can press the hat switch on your joystick. (The hat switch is the button that sticks straight up out of the middle, near your thumb) If you look out the left or right window, as shown in Figure 1-9, you’ll notice the position of each wing relative to the earth’s horizon.
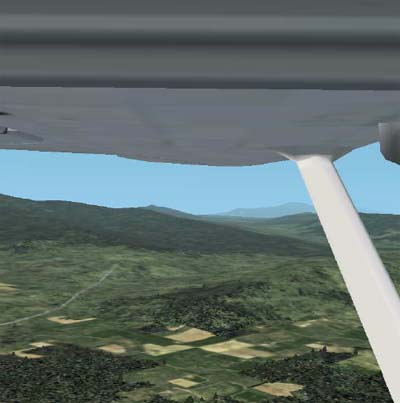
In straight flight, both wings should be the same distance above the horizon (refer to the horizon, not the mountains).
Having the Right Attitude
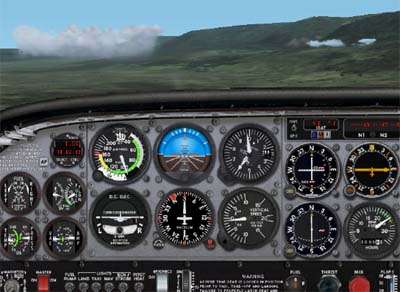
In real airplanes, I prefer that my students almost strip the gears in their neck by looking right and left out the windows. This helps them check the wing’s position and keeps their eyes focused out the cockpit looking for traffic. No, I don’t mean automobile traffic, either. I mean airplane traffic. In the simulator, however, it’s inconvenient to keep shifting views to the left and to the right. So you’ll use the attitude indicator to help maintain straight-and-level flight. The attitude indicator is located at the top of the six main flight instruments directly in front of you (Figure 1-10).
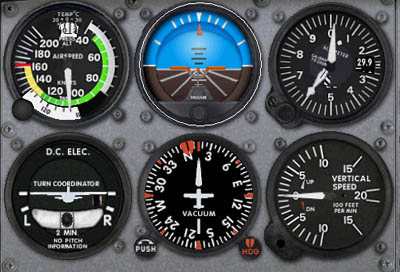
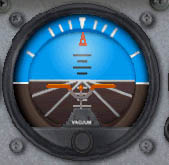
The attitude indicator is an artificial representation of the real horizon. Just as its name suggests, the attitude indicator displays the airplane’s attitude (its upward or downward pitch and the bank the wings make with the horizon). The upper half of the attitude indicator is blue (like the real sky, unless, of course, you fly in Los Angeles), the bottom half is brown (like the surface below us). The thin white line between these colors is the artificial horizon line. Pilots use the attitude indicator when they can’t see the earth’s horizon because of restrictions to visibility or when it’s inconvenient to look at the wing tips (which will usually be your situation when flying the simulator).
By moving the joystick to the left, the airplane banks to the left, which dips the left wing downward toward the ground, as shown in Figure 1-11A.
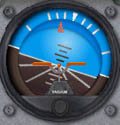
Figure 1-11A 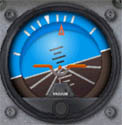
Figure 1-11B 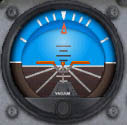
Figure 1-11C
This is how you begin a left turn. Notice that the miniature (orange-winged) airplane in the attitude indicator also appears to dip its left wing toward the ground. Mechanically speaking, it’s really the background of the attitude indicator that moves and creates a picture of the airplane’s attitude. Nevertheless, you can always tell which way you’re banking by determining which one of the small orange wings in the attitude indicator dips toward the ground. (This is easy since you only have two choices).
By gently moving the joystick to the right in the same manner just described, the attitude indicator will indicate a right turn. Now the orange-winged plane’s right wing dips toward the ground, as shown in Figure 1-11B. Moving the joystick to the right or left until both of the miniature plane’s wings are parallel to the artificial horizon line returns the joystick to its center (default) position and returns the airplane to straight flight, as shown in Figure 1-11C. After all, if the wings aren’t banked, the airplane isn’t turning.
Know Where You’re Heading
There is one more way to know if you’re flying straight. This involves using the airplane’s heading indicator, as shown in Figure 1-12.
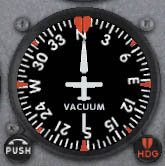
Figure 1-12 shows the airplane’s heading indicator (sometimes called the directional gyro). It’s found in the middle of the bottom row of the six main flight instruments that we’ll be discussing soon. Think of the heading indicator as a mechanical compass that shows which way your airplane points. Notice the numbers on the face of the heading indicator. Add a single zero to any number on the face to get the airplane’s actual heading. In other words, 6 is really a heading of 60 degrees (spoken as zero-six-zero degrees). The number 33 is actually a heading of 330 degrees. (When we say that aloud, we say “three-three-zero degrees” for extra clarity. It’s important to be extra clear when you’re flying.) These numbers appear at 30-degree intervals. Between these numbers are 5- and 10-degree heading increments.
To fly a specific heading, simply turn the airplane in the shortest direction to the heading desired. For example, turn the airplane until the nose of the airplane in the heading indicator points to the letter W for west (this is a heading of 270 degrees). Of course, if the heading remains constant, then you’re flying straight and thus, not turning. This is another way to identify that you’re flying straight.
Now that you understand the straight portion of straight-and-level flight, let’s move on to the level portion of this maneuver.
Making Sure You’re on the Level
Let’s talk about what happens to your altitude when you pitch the airplane’s nose up or down. When you pitch the airplane up by applying back pressure on the joystick, the attitude indicator’s miniature airplane also points upward toward the sky (the blue), as shown in Figure 1-13A. The attitude indicator’s vertical calibration lines are worth five degrees each, so you read them (from bottom to top) as 5, 10, 15, and 20 degrees of pitch.
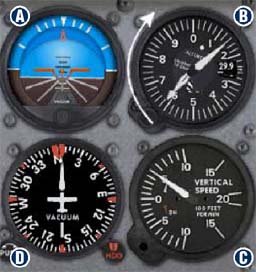
Look at the altimeter, which is located directly to the right of the attitude indicator (Figure 1-13B). The biggest hand (the hundred-foot hand) will normally move clockwise when the nose is raised. And, just like the hands of a watch, clockwise movement means something is increasing. In this case, it’s your altitude.
Directly below the altimeter is the vertical speed indicator (VSI). Its needle also deflects upward when you pitch the airplane’s nose up, showing a rate of climb (Figure 1-13C). These are additional indications that you’re climbing and not maintaining level flight.
When the joystick is returned to its center position, the airplane will begin to settle back into level flight (assuming the airplane is properly trimmed—we’ll talk about this shortly).
When you pitch the airplane downward, the attitude indicator’s miniature airplane points toward the surface (the brown color), as shown in Figure 14.
The altimeter’s hands will begin to unwind (rotate counterclockwise), indicating a loss of altitude. The VSI will also show a rate of descent as its needle deflects downward. It’s safe to say that if the big hand of the altimeter stops moving and the VSI needle indicates zero, then you’re in level flight. In fact, this is precisely how pilots confirm that their airplane is in level flight.
It takes practice to keep these needles stationary (in real life, they’re always moving just a tiny bit). The average private pilot does a great job if he or she remains within 100 feet of a chosen altitude. Unfortunately, when I was a student, I found it much easier to keep changing the target altitude at which I wanted to be (until, of course, I finally perfected this skill).
In the Interactive Lesson, you’ll practice maintaining a straight course by keeping the attitude indicator’s miniature airplane (the orange wings) parallel to the artificial horizon line. If a wing dips right or left, you’ll raise it by moving the joystick in the opposite direction.
You’ll also get some practice at maintaining level flight by keeping the altimeter’s hundred-foot hand stationary. It shouldn’t move. If it does, then you’ll use the joystick to change the pitch slightly until it stops moving. This will be the pitch attitude required for level flight.
Time for a Trim?
Airplanes are subject to an assortment of aerodynamic forces. Some try to pitch the nose up; others try to pitch it down. Engine power, weight placement, and lift are just a few of these forces. What does this mean to you? Well, if the airplane wants to pitch forward, you can’t sit there pulling back on the joystick for the entire flight. Applying continuous pressure on the control wheel to maintain pitch attitude means your arms would tire quickly (your personal trainer would be proud of you, but I wouldn’t). Fortunately, airplanes have something known as a trim tab to take the pressure off the control wheel (and off the pilot!). Let’s look at how the trim tab works, and then we’ll talk about how to use it.
How Trim Tabs Work
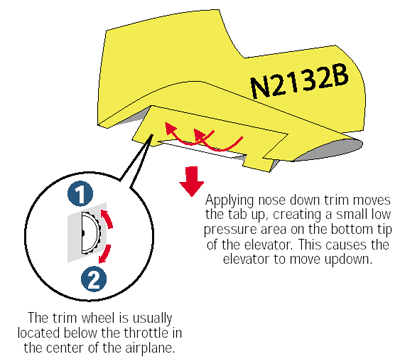
A trim tab is a small, moveable surface attached to the main surface you want to control (in this case, it’s the elevator). Figure 1-15A shows the trim tab and the trim wheel that’s used to change the trim tab’s position. In the real airplane, the wheel is usually located between the two front seats or on the lower portion of the instrument panel.
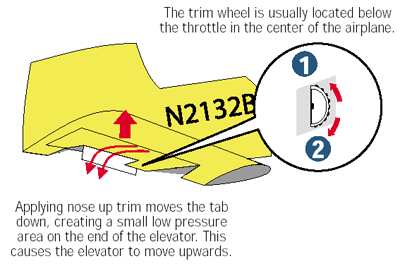
Moving the trim tab creates a slight pressure difference on the end of the control surface to which it’s attached. Just enough pressure is created to keep the primary control surface in the desired position without having to hold the control wheel in place. Notice that the trim tab moves in a direction opposite to the primary control surface it affects. If you want the elevator to deflect upward (as if you’re pulling back on the wheel in a climb), the trim tab must move down, as shown by Elevator A in Figure 1-15A.
To maintain a downward deflection of the elevator (as if you’re in a descent), the trim tab must move upward, as shown by Elevator B in Figure 1-15B.
Think of trim as an imaginary hand that holds the airplane in the desired attitude while eliminating the pressure you apply to the joystick. The trim control may be found on your joystick in the form of small wheels or buttons.
If you don’t have a trim button on your joystick, you can use two keys on the number pad to trim the airplane for the proper pitch attitude. The END key provides nose-up trim, and the HOME key provides nose-down trim.
Here’s how you should trim an airplane for straight and level flight. First, check to see if the airplane is already properly trimmed. Do this by easing up on the pressure being applied to the joystick. Then, watch the VSI’s needle. If the needle shows a climb (rotates upward), the airplane needs nose-down trim. Apply a little forward pressure on the joystick to return to level flight, then press HOME once for a little nose-down trim (or use the nose-down trim button). Once done, release the pressure on the joystick and see what happens.
The more you push the trim button, the more trim you apply. So be patient. You may have to repeat this same process several times until the VSI’s needle remains relatively horizontal, near the zero climb-rate value.
If the VSI’s needle shows a descent (rotates downward), apply a little back pressure on the joystick to return the airplane to level flight. Then press END on the number pad a few times for nose-up trim (or use the nose-up trim button). Once done, release the pressure on the joystick and watch the VSI’s needle response. Repeat the process as necessary until the airplane neither climbs nor descends.
I prefer to use the VSI’s needle for trimming, since it’s very sensitive. I don’t mean that it will cry if you tell it that it’s ugly. I mean that its needle is sensitive to small changes in pitch. This makes it easier to detect deviations from level flight. In a future lesson, I’ll show you how to use the VSI’s needle for trimming in a climb or descent.
Many airplanes have trim for bank control, called aileron trim. You may even have this as part of your joystick assembly. Bank trim is sometimes necessary when the wing’s fuel load is unbalanced or if you have heavier passengers sitting to one side of the airplane.
Regardless of how well the airplane is trimmed, it may oscillate up or down slightly, varying its altitude by perhaps 100 feet up or down. That’s the way airplanes are. Each one likes to do its own thing and may vary slightly in altitude and heading even when properly trimmed. Let them go, unless they wander too far off. Your job is to make the airplane as easy as possible to fly so you have more time to think, plan, plot, and scheme your way to safe simulator flying.
You should be proud of yourself for accomplishing your first ground school session. Hey, I’m proud of you! Now it’s time for some interactive flight training.
Click the Fly This Lesson Now link to practice what you’ve just learned. In the next ground school class, I’ll introduce you to the basics of turns.