Lesson 6: Landings
There’s a saying that every pilot knows, and since you’re going to be a pilot, you should know it, too: Takeoffs are optional; landings are mandatory.
Landings are to a pilot what a beautiful painting is to an artist. When you look at Leonardo da Vinci’s “Mona Lisa” (or its famed counterpart, the “Mona Larry”), you see a beautiful work of art. To pilots, a good landing offers the same satisfaction. I intend to show you how to paint that beautiful picture on any runway of your choice.
We’re going to approach this class a little differently than I would in the actual airplane. I plan on teaching you how to land before teaching you about flying the traffic pattern (which will be covered in the private pilot curriculum). That way, when I teach you to take off and fly a traffic pattern, you can actually land instead of dropping to earth with all the grace of a butterfly that’s overdosed on caffeine. Besides, something tells me that if we don’t do landings now, you’ll be out there practicing them yourself. So let me help you put your hand in the cookie jar.
I always tell my students that airplanes will land themselves (well, almost). All the pilot has to do is nudge the plane toward the runway and twiddle the throttle a bit. Let’s examine how this is done by landing an airplane in your brain, or, to put it another way, by using your imagination to make your first landing.
目次
- Your First (Mental) Landing
- Landing Details
- Playing with Power
- Visual Approach Slope Indicator (VASI)
- Glide Path Adjustment If You’re Too Low
- The Landing Flare
- Flap over Flaps
- Landing using Flaps
- ESTIMATED TIME TO COMPLETE
- REQUIRED KNOWLEDGE/SKILLS
- THE WEATHER
- RECOMMENDED CHARTS
- ABOUT THE FLIGHT
- KEY COMMANDS TO REMEMBER
- FLIGHT CRITERIA
Your First (Mental) Landing
Before we get started, I’d like to note that we’ll use a 65 knot approach speed for these ground school examples. Our actual flight lessons will use 75 knots. This increase in approach speed will make it easier for you to acquire landing skill in the simulator. Always refer to the appraoch speed reference data on the kneeboard for the aircraft you are flying.
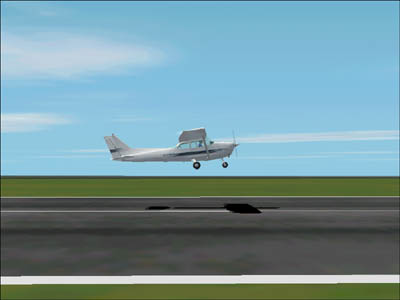
For this visualized example, I want you to imagine that you’re lined up with a long runway. Visualize yourself at 500 feet above the ground while approaching at a speed of 65 knots. The power is set to idle. Mentally adjust the pitch to maintain 65 knots. This will require about a 10-degree nose-up pitch, as shown in Figure 6-1.
Of course, you should also imagine trimming the airplane to maintain 65 knots. Now for the best part of this example: Imagine flying 65 knots at this pitch attitude all the way to touchdown with the power set to idle. What do you think will happen?
If you said that the airplane will land, you’re correct. In fact, as long as you maintain an airspeed of 65 knots, the airplane will almost land itself. Of course, if there is any carbon on the runway, you’ll covert it to diamonds, perhaps sending a few groundhogs six feet under in the process. Despite the impact, this is nearly what a landing is like. The only difference between what you imagined and what makes a good landing is something called the landing flare.
The fact is that we don’t fly airplanes into the ground. We flare them just before we land. No, a flare isn’t a lighted stick you throw out the window to let others know you’re landing; It’s a maneuver that involves changing the descent path to shallow the airplane’s approach to the runway (that is, to make the approach less steep). The flare is begun during the last 10-15 feet above the ground. We’ll talk about this in a bit. For now, you should understand that the secret to making good landings is letting the airplane do most of the work. In other words, if the airplane is trimmed for the proper airspeed, there’s little else to do other than keep the wings level and make small adjustments in power to vary the glide path. The airplane will almost land itself if you keep it aligned with the runway.
Landing Details
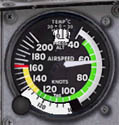
Why did I choose 65 knots as the speed to fly the final approach? (Final approach is the portion of the landing pattern where the airplane is lined up with the runway.) Pilots typically use a final approach speed that is 30 percent above the airplane’s stall speed. In our case, the airplane’s no-flap stalling speed is 50 knots (this is where the green arc begins on the airspeed indicator). Thus, our “plus-30 percent” speed is 65 knots. Fly a little faster than that, and the airplane will tend to float and resist touching down on the landing spot you want. (Approaching too fast is one of the biggest mistakes new pilots face while learning to land). Fly a little slower, however, and you’ll place the airplane uncomfortably close to its stall speed. Controlling your airspeed is perhaps the most important quality for a successful landing.
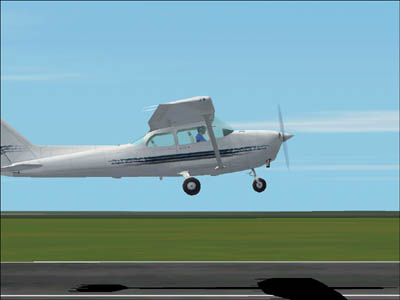
For our lessons’ airplane, 65 knots keeps the nose gear just a little higher in relation to the main gear, as shown in Figure 6-2.
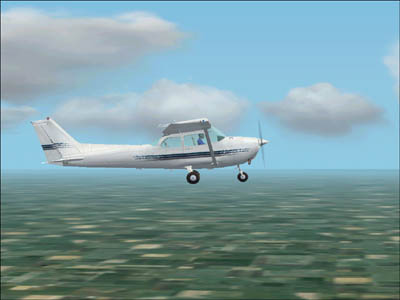
Remember, as the airplane slows down, the angle of attack must increase to maintain lift. Therefore, an approach speed of 65 knots requires a slightly larger angle of attack. Thus, the nose gear rises relative to the main gear. Keep in mind that the Cessna 172 is a tricycle-gear airplane. It’s designed to land on the two main gear wheels first, after which the nose gear is gently lowered to the ground. Land on the nose gear first, and you could invoke the scariest phrase in a pilot’s vocabulary: insurance deductible. You could also “porpoise,” which is a bouncing action, not a tuna’s playmate.
Playing with Power
Let’s say you’ve trimmed the airplane for a power-off descent at 65 knots. As you approach the runway, you discover that your approach path will take you to a point short of the runway. This isn’t a good thing. After all, airplanes are supposed to land on runways, not in the farmer’s field short of the runway. How can you tell if you’re going to land short in the first place and what you should do to correct this problem?
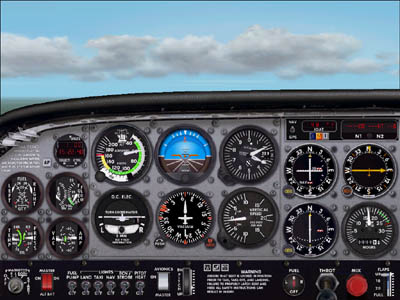
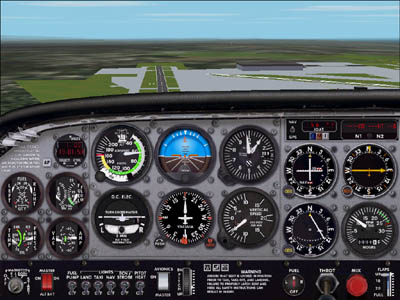
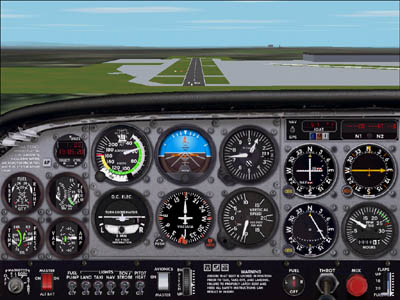
You can tell that you’re descending too quickly when you observe the runway geometry changing, as shown in Figure 6-3.
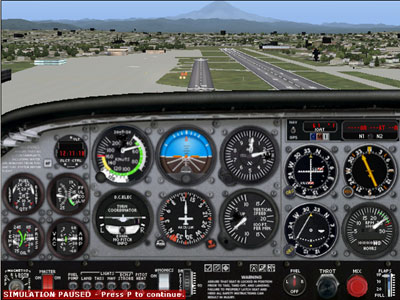
Figure 6-3A is what the runway should look like over the panel when you’re on an acceptable glide path. Figure 6-3B is what the runway looks like when you’re too low (below the desired glide path). Figure 6-3C is what you’ll see when you’re too high (above the desired glide path).
Notice that the distance between the far end of the runway and the distant horizon decreases in Figure 6-3B. Also notice that both ends of the runway appear to converge. Both of these are good visual cues that you’re below a desired glide path. Finally, you know you’re too low when desert shrubbery appears at eye level and you skid your tires on a desert tortoise.
Without using any mechanical or electronic aids, it does takes some practice and experience to tell when you’re on the correct glide path to the runway. At some airports, there are devices that can help you determine the proper glide path for a particular runway. Take a look at the sidebar on VASIs to learn more about these. When you first begin the interactive lesson on landings, it’s okay to rely on your gut feeling about whether or not you’re high or low on approach; this will train your visceral senses. If you hear the wheels squeak before reaching the runway, you know you’re too low. If you see the runway disappear underneath the airplane, you know you’re too high. It doesn’t get any more basic than that. After you gain just a little experience, you’ll get better and better at selecting the proper glide path. Trust me, after all, I’m your flight instructor.
Visual Approach Slope Indicator (VASI)
Under poor visibility conditions or at night, the lack of outside visual clues sometimes makes determination of the proper landing glidepath difficult. Fortunately, there is something known as a Visual Approach Slope Indicator (VASI) that provides you with a visual clue as to the proper glidepath to fly. (By the way, VASI is pronounced VAZ-eee. It is not something in which you put flowers).
A VASI usually consists of two pairs of lightbars along the side of the runway (it’s often called a two-bar VASI for this reason). The two VASI bars are usually 500 to 1,000 feet from the approach threshold, as shown in Figure 6-13. These lights project either a red or white color, depending on your altitude. The colors are constant and don’t actually change within the box. What it does change is your height, which allows you to look at the VASI from different angles and see different colors.
When you are below the proper glideslope, both VASI bars show red. Some pilots remember that this signals trouble by thinking of it as, “Red over red, you’ll conk your head.” You should level off until you see red over white. Red over white means that you’re above the glidepath for the bar closest to you and below the glidepath for the bar farthest away. This is a complicated way of saying you’re on the glidepath that will plunk you down halfway between the two bars. A good way to remember this is, “Red over white, you’re all right.”
Of course, if you’re too high, both bars will show white. A good memory aid for this is, “White over white, you’ll soon be out of sight.” Increase the descent rate until the upwind bar turns red. You can expect the VASI’s red and white bars to transition through a pink color as your altitude in relation to the proper glideslope changes.
If you see flashing red over flashing white, then you’re making an approach to a police car. Now you’re in really big trouble (besides, it’s not natural for the VASI bars to chase cars down the highway).
When we practice landings in this lesson, you’ll notice another type of visual glide slope indicator at Bremerton National Airport. Figure 6-14 shows a PAPI (Precision Approach Path Indicator). It uses red and white signaling colors in an arrangement of four horizontal lights to identify the correct glidepath. These four horizontal light units appear to change color as your glidepath varies. If you’re above a 3.5 degree glide slope, the PAPI shows all four light units as white. When on a 3 degree glide slope, the right two lights are red and the left two lights are white. When below a 2.5 degree glide slope, all four light units show red. A pink transition between lights does not exist as it does with a two- or three-bar VASI.
Glide Path Adjustment If You’re Too Low
Okay, let’s suppose you know you’re too low. How do you correct for this?
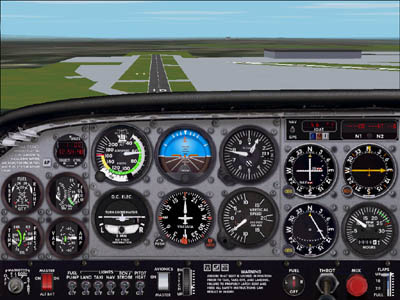
At the first indication of being too low, increase power. This is a no-brainer (although I want you to keep your brain because you’re going to need it for the flare). You’ll notice that your descent rate immediately decreased a little after adding power, as shown in Figure 6-4.
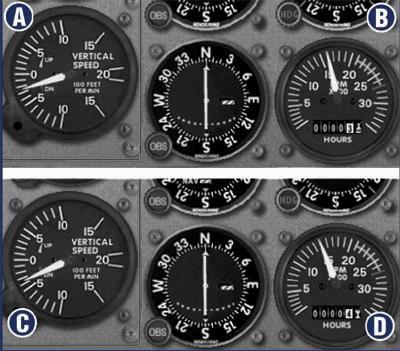
C-VSI and D-Tachometer with slightly less power.
Small power adjustments make small adjustments in glide path. Use whatever power you need to get the airplane to the runway, all the while maintaining an approach speed of 65 knots. Ideally, your glide path should take you straight to the runway without numerous vertical bends or curves in the airplane’s trajectory. Ah, if this were only a perfect world, eh? It’s not. Therefore, be willing to make any power adjustments to vary the glide path as necessary to make it to the runway.
On the other hand, if you’re way too low, it’s perfectly reasonable to add power and hold your altitude until you’re in a position for a normal glide to the runway. Once again, experience will tell you when you’re in a position to reduce power and begin a normal glide to the runway. Of course, if you’ve misjudged and are really low, you should start a climb. Then, when you’re high enough for a normal glide to the runway, you reduce power and commence the descent. It may look like a spaghetti approach, but it’s your approach (however, you should be prepared for an “al dente” landing). Do whatever it takes to get to that runway. Make sure you use your trim during this process, too.
What do you do if you’re too high? We’ll cover that shortly. For now, let’s look at how to flare the airplane for landing.
The Landing Flare
Until now, you’ve mentally flown the airplane onto the runway at a final approach speed of 65 knots. You might be able to get away with this in a real airplane, but only in an emergency. At 65 knots, the simulated airplane is in a minimally acceptable landing attitude (that is, the airplane is pitched nose-up, putting the nose gear slightly above the main gear. This is a good thing). Additionally, the descent rate in this simulation isn’t so excessive that the landing will bruise everyone’s bones, although it’s still possible to sustain some damage to a real airplane during landing. Therefore, to land properly under all conditions, you must learn to flare the airplane to ensure a soft, safe touchdown.
You should begin the landing flare at approximately 10 to 15 feet above the runway, as shown in Figure 6-5.
While descending at the desired approach speed, start the flare by raising the nose with a slight and gentle pull on the joystick. How much of a pull? Once again, that’s a matter of experience. The objective is to lower your descent angle and decrease the airspeed for landing. Now the airplane can settle onto the runway at a smaller descent rate and at a slightly higher nose-up attitude. This makes for a softer touchdown and keeps the nose gear higher than the main gear, as shown in Figure 6-6.
If your speed is too high on the approach (that is, faster than 30 percent above the airplane’s stall speed), it’s likely that you’ll float or possibly begin to climb during the flare. This is not a good time for this to happen. Floating means the airplane just won’t land. Unless you have a long runway, this may mean that you’ll turn an expensive airplane into an off-road vehicle as you bust through the fence surrounding the airport. If you pull back too quickly during the flare, you may find yourself 50 to 100 feet above the runway while out of airspeed and ideas at the same time. In this instance, you’ll need to add power, lower the nose a bit, and descend to a point where you can flare again. If you don’t do this, the airplane might stall. Excuse me for saying this, but practicing stalls at 100 feet above the ground is definitely a ground-breaking idea. (Ouch! Deductible!) The only time it’s legitimate for the airplane to stall during the flare is when it does so a few inches above the ground. This way, it only has inches to fall, which hurts neither the airplane nor those on board. Yes, the flare requires a little timing, but there’s a lot of latitude in how it’s accomplished.
How can you tell when you’re at a flare height of 10 to 15 feet? In a real airplane, you have peripheral vision to help. In the normal cockpit view of the simulator, you can’t use any cues from the side windows because you don’t have side windows. (You could try the Virtual Cockpit view, which allows you to pan around in any direction using the hat switch on top of your joystick. Try it! On the View menu, select View Options, and then choose Virtual Cockpit.)
With practice, even in the normal cockpit view, you’ll develop your ability to determine your height above the runway. In the meantime, you can use the altitude of the runway (or airport elevation) as an aid. Suppose, for instance, that the airport’s elevation is 2,787 feet above sea level. You can begin your flare when the altimeter reads 2,800 feet. Of course, this is only a helpful hint when learning to land in a simulator. You shouldn’t be doing this when you become a pilot and are landing a real airplane. It will make your copilot nervous.
There is one more nifty idea that can help you land smoothly if you’re having a hard time identifying when to flare. When you even think you’re getting close to flare height, add just enough power to slow the descent rate to 100 feet per minute while maintaining your approach speed, as shown in Figure 6-7.
This is close to how seaplane pilots make approaches to glassy lakes that have no ripples on them. It’s difficult to judge your height above a lake that reflects like a mirror. Maintaining a 100-foot-per-minute descent rate at the approach speed will allow the airplane to make an acceptable touchdown (and avoid conking a trout on its head). Doing this on a runway means that your landing distance will be longer because of the addition of power, so be sure to have a long enough runway.
Under normal conditions, you should gradually reduce power to idle when you begin the flare. Then, you should gently raise the nose to flare attitude and allow the airplane to settle onto the runway at this attitude. If you need a better idea of how high to raise the nose, trying raising it to a 14-degree pitch attitude on the attitude indicator. At this attitude, the airplane will settle onto the runway. As the airplane continues to slow down, you’ll need to increase back pressure on the joystick to maintain the desired nose-up flare attitude. Once you’ve touched down, gently release any joystick pressure to lower the nose gear onto the runway (in airplanes, the nose gear provides directional control after landing).
It’s also not unusual to lose sight of the runway over the panel as you begin the flare. In a real airplane, you could jack the seat up to get a better view. (No, the instructor isn’t going to put you on his or her lap to give you a better view.) In the simulator, you have neither a jack nor an instructor to give you a boost. Raise the simulator’s seat by pushing SHIFT+ENTER. Don’t worry, this isn’t an ejection seat. Raise the seat as high as you need to get the best view. To lower the seat, press SHIFT+BACKSPACE.
Wonderful! You have a flair for the flare. Of course, there’s something of an art to perfecting this, but you’ll eventually master it with practice. Now that you understand the flare, let’s discuss how to do it with full flaps. When do we use flaps? When the airplane is too high and we need to increase our rate and angle of descent. Let’s discuss flaps in detail before we discuss how to land an airplane using them.
Flap over Flaps
Ever wondered why the wings of large commercial airplanes sprout aluminum prior to takeoff and landing? Fast airplanes require small, thin wings to achieve the eye-popping velocity needed to satisfy today’s speed-hungry air traveler. The problem with thin, small wings is that they stall at high speeds. Most jet airliners would have to take off and land at close to 200 mph to achieve a safe margin above stall if they couldn’t enlarge and curve their wing’s surface area enough to create a temporary, low-speed wing. Engineers, however, design wings to do just that by supplying them with flaps. Extending or retracting flaps changes the wing’s lift and drag characteristics.
Lowering flaps lowers the trailing edge of the wing, as shown in Figure 6-8.
A-Wings Slightly Curved, flaps up. B-Wing Curved More.
The wing’s lift is increased in two ways. First, the lowered trailing edge increases the angle the chord line makes with the relative wind. Greater lift results from this increased angle of attack. Second, the lowered trailing edge increases the curvature on part of the wing, resulting in increased air velocity over the wing’s upper surface (many flaps even increase the wing’s surface area by extending downward and outward, as the Cessna 172 do). Because of the larger angle of attack and greater curvature, flaps provide you with more lift for a given airspeed.
What’s the reason for putting flaps on small airplanes? First and foremost, they create the lift necessary to maintain flight at slower airspeeds. When landing, your goal is to approach and touch down at a reasonably slow speed. You certainly don’t want to touch down at cruise speed. Such a high-speed landing might just turn your tires into three little puffs of smoke. Flaps allow you to approach and land at a slower speed while maintaining a safe margin above the stall speed.
A slower speed on touchdown means less runway is used to stop. This is an important consideration if the runway is short. Alternatively, if the wind is gusty, you might consider approaching with little or no flap extension. At the slower speeds allowed by flaps, the airplane becomes more difficult to control because the controls are not as responsive. Let’s see how effectively the flaps increase lift by referring to the airspeed indicator (as shown in Figure 6-9).
The beginning of the white arc (B) is known as the power-off, full-flap stalling speed (in nonaccelerated flight at the airplane’s maximum allowable weight). It’s the speed at which the airplane stalls with flaps fully extended, power off, and the gear extended. In Figure 6-9, the airplane will fly when 53 knots of wind blows over the wings if they are below their critical angle of attack.
The high-speed end of the white arc is the maximum speed you can fly with flaps fully extended. Flying beyond this speed can damage the flaps. In this example, you wouldn’t want the airspeed indicator to indicate more than 107 knots with flaps extended (some airplanes, however, allow you to fly at a higher speed with partial flaps extended). Bringing broken or bent airplanes back from a flight isn’t a good idea, even if they are rentals (you’ll find out how bad an idea it is when you get the bill for unbending the metal).
Notice that the white arc (B) begins at a speed seven knots slower than the green arc (A). In an earlier discussion, we learned that the green arc is the power-off stalling speed with flaps retracted (gear retracted, too). This airplane must have 60 knots or more of wind flowing over the wings to fly with flaps retracted. With flaps fully extended, you can touch down at a slower speed—seven knots slower, to be exact (the full-flap stall speed on the airspeed indicator assumes the airplane is flying at its maximum allowable weight).
But, as might say, “Those who sow ‘wild oats’ eventually have crop failure.” In other words, you don’t get something for nothing. Flaps provide you with lift, but they also produce drag. Full flaps create a low-speed wing. Try to accelerate it, and at some point, drag defeats your efforts. Fortunately, the first half of flap travel usually provides more lift than drag. The last half usually provides more drag than lift. This is why some aircraft manuals recommend only 10 to 25 degrees of flaps for takeoffs on short fields (usually one or two notches on a three- to four-notch, manual flap system).
If you’re too high while on approach to land, you can select full flaps to increase the airplane’s drag. It’s common to use flaps only when descending within the traffic pattern and not when descending from cruise flight. After all, cruise flight descents are efficient and fast at higher speeds, where the drag is greater. If you wanted to descend with flaps from cruise flight, you’d have to slow the airplane down below maximum flap-extension speed (the top of the white arc) before applying flaps. This would be cumbersome. The airplane can descend faster at cruise speed with reduced power while getting you to your destination sooner.
Since flaps provide more lift at slower speeds, think carefully about how and when they are retracted while airborne. If you’re making a full-flap approach and it’s necessary to go around (that is, give up this approach, climb, and return for another landing attempt), don’t retract the flaps all at once! This would be like having someone remove a part of your wing at a slow speed. The sudden and often dramatic increase in stall speed could place you near a stall before you can accelerate to a safer speed. Apply full power first, and then retract the flaps in increments. In airplanes with 30 to 40 degrees of flap extension, retract the flaps to their least-drag/maximum-lift position. Usually, this position is found at one-half flap travel (depending on the airplane). In airplanes with three notches of manually applied flaps, retract one notch first, followed by the other two, once the airplane begins to accelerate.
Landing using Flaps
You can apply flaps using the flap handle (Figure 6-10) or by pressing the F7 key. (You can retract them by pressing F6.)

Since flaps alter the lift and drag characteristics of the wing, be ready to adjust the pitch to maintain the airspeed you want. Applying full flaps creates a lot of drag. Flap application also causes the airplane to pitch up, requiring forward pressure on the joystick to maintain your airspeed. Here’s how the process might go if you’re too high and need to add flaps to compensate.
Since the full-flap stalling speed for this airplane is 40 knots (that’s where the white arc begins on the airspeed indicator), you’ll want to approach at a slightly higher speed. Remember, pilots use an approach speed that’s 30 percent above the stall speed for the airplane’s present configuration. For this simulation, let’s use 60 knots.
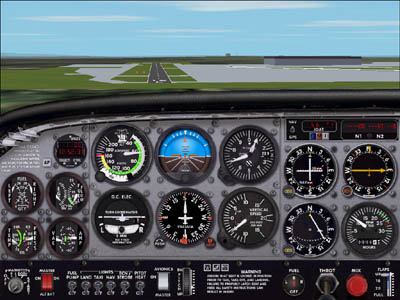
While approaching without flaps at 65 knots, let’s assume we notice the runway is disappearing below the top of the airplane’s panel (Figure 6-11).
This is one cue that you’re going to be too high on the approach. Now’s the time to add flaps (or more flaps). You’ll press F7 once to lower 10 degrees of flaps. You’ll also have to apply a little forward pressure to correct for a flap-induced pitch up, and then readjust the pitch for a final approach speed of 53 knots. Don’t forget to trim!
You’ll apply the other 20 degrees of flaps in 10-degree increments by pressing F7 two more times until 30 degrees of flaps are extended (that’s full flaps for this airplane). As you press F7, make sure you adjust the pitch for 60 knots of airspeed.
If flap usage is sufficient, you’ll notice that the runway stops disappearing underneath the airplane. The airplane has also pitched forward a bit, allowing a better runway view. The descent rate will also be increased, and the airplane will fly at slightly less of a nose-up pitch as a result of flap application (that is, with flap application, the nose gear isn’t as far above the main gear—an additional reason for the flare). as shown in Figure 6-12.
One of the first things you’re sure to notice while using flaps is that the rate of descent is higher. That’s why the flare needs to happen a little faster when using flaps. When you’re at flare height, raise the nose from its present attitude to about 14 degrees nose-up pitch. Hold that attitude until touchdown. Yes, you may hear the stall horn (more on this in the stall section) as you touch down, but that’s okay since you’re just inches above the ground.
So why use flaps? They allow you to touch down at slower speeds, which means the airplane needs to dissipate less energy when stopping. Additionally, flaps come in handy when you’re too high on approach. They are also useful when landing over an obstacle or when landing on a short runway.
This Ground School lesson completes your basic Student Pilot training. Click the Fly This Lesson Now link to practice what you just learned.
Once we complete the two interactive lessons on landings, you’re going to solo! Then you’re ready to move on to the Private Pilot lessons. So be prepared to wander the skies alone in search of new adventures.
ESTIMATED TIME TO COMPLETE
About 20 minutes
REQUIRED KNOWLEDGE/SKILLS
Reading the Ground School material before starting this lesson will help you better understand the skills being taught.
THE WEATHER
The sky is clear and the winds are calm.
RECOMMENDED CHARTS
None
ABOUT THE FLIGHT
You’ll start in the air on final approach to runway 19 at Bremerton National Airport (KPWT). In Part 1, you will fly through hoops drawn by Flight Simulator to help you descend and fly to the runway. In Part 2 you will use the Precision Approach Path Indicator (PAPI) to help you determine your glide path. In both lessons, you will learn to flare the airplane above the runway and brake to a stop once on the runway.
KEY COMMANDS TO REMEMBER
None
FLIGHT CRITERIA
For Part 1, you will be asked to stay within the hoops and raise the nose to 10 degrees nose up pitch when instructed to flare.
For Part 2, you will be asked to maintain airspeed no more than 10 knots above and no less than 5 knots below your assigned approach speed. You’ll be asked to raise the nose to 10 degrees nose up pitch when instructed to flare.
For both lessons, you must land on, and come to a complete stop on, the runway.