Lesson 5: Takeoffs
Years ago, a fellow flight instructor had a student who spent a few too many hours on the high seas. On his first flight lesson, he walked out to the airplane, loosened all three tie-down ropes, tossed them aside, and yelled, “Castoff!” Hmmm, apparently, he still had a little sea water on the brain.
Sorry, but airplanes don’t do castoffs; they do takeoffs. And once you’re in the air, you need a practical way to return to an airport in preparation for landing. It’s similar to bringing a boat in to dock. You don’t just barge into the herd of boats heading for port. You get in line and follow the other boaters and fishermen back home. This way, they don’t get upset, which can lead to fishticuffs. And that will put the fear of cod in you.
目次
Up, Up, and Away
On takeoff, your objective is to accelerate the airplane to a sufficient speed where you can raise the nose to a climb attitude. This is sometimes known as rotating. I recommend rotating at least 5 knots above the airplane’s no-flap stalling speed (which, in the case of our lessons’ plane, is 50 knots-the beginning of the airspeed indicator’s green arc). When the airspeed indicator shows 75 knots, raise the nose to the attitude that results in an 80-knot climb. (You’ll learn what this attitude is from experience. In this case, it’s approximately 11 degrees nose-up pitch, which is just above the second calibration mark on the attitude indicator.) Ready? Here’s how to do it.
First, apply full power and accelerate down the runway centerline. When the airspeed indicator shows 55 knots, the airplane’s ready to fly. So fly. Rotate the nose to an 11-degree positive pitch, as shown in Figure 5-1.
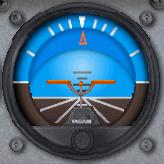
It takes a little extra initial back pressure on the joystick to unstick the airplane from the runway during rotation. Be patient. The airplane will eventually accelerate to 75 knots at this attitude.
Using Rudder Pedals on Takeoff
If you’re using rudder pedals and don’t have the Autorudder feature active, then you should expect the airplane to yaw to the left when you add power. This happens for several reasons. Things like the propeller slipstream and engine torque all contrive to make this airplane turn left during takeoff. Just add enough right rudder to keep the airplane aligned with the runway. Of course, if you don’t have rudder pedals, don’t worry about the airplane tending to turn left on takeoff. Flight Simulator’s Autorudder feature will prevent these forces from affecting you.
Click the Fly This Lesson Now link to practice what you’ve just learned.
Of course, what goes up must eventually come down. And when it does, it better be able to land properly. That’s why our next class will cover landings.
In this lesson you’ll learn to take off
ESTIMATED TIME TO COMPLETE
10 minutes
REQUIRED KNOWLEDGE/SKILLS
Reading the Ground School material before starting this lesson will help you better understand the skills being taught.
THE WEATHER
The sky is clear and the winds are calm.
RECOMMENDED CHARTS
None
ABOUT THE FLIGHT
You’ll start on the ground next to the departure runway. You’ll learn how to taxi onto the runway and take off.
KEY COMMANDS TO REMEMBER
Numpad 4 to look left and Numpad 6 to look right. Be sure that the NumLock light on your keyboard is lit.
FLIGHT CRITERIA
You’ll be asked to maintain airspeed within 5 knots and pitch attitude within 10 degrees as assigned.