Lesson 2: Turns
How Airplanes Turn
There are many misconceptions in aviation. For instance, there are pilots who think propwash is a highly specialized detergent. And a select few think that when an instructor says, “Okay, taxi,” that they should call a cab.
As a young student pilot, an FAA inspector asked me how an airplane turns. I looked at him and said, “With the wheel, sir.” He clutched his chest and shook his head in disbelief. I admit that my answer was a little off and that he was a tad upset (the foam around his mouth, and his eyebrows merging with his hairline were good clues). Just so you don’t have any of these problems, let’s examine what causes an airplane to turn and then look at how you can perform this nifty little maneuver.
目次
The Lightness of Lift
Airplane A in Figure 2-1 shows a view of an airplane in straight-and-level flight.
Banking the airplane causes the lift force to tilt,
which pulls the airplane in the direction of the bank.
Technically, it’s the horizontal component of
the lift force that makes the airplane turn.
From this vantage point, lift acts vertically, pulling upward on the airplane and keeping it suspended in flight. Of course, if lift can pull upward, it can also pull a little to the left or right. When it does this, the airplane turns.
Airplane B in Figure 2-1 shows the total lift force on a banked airplane. Part of the lift force pulls the airplane up (the vertical component of lift), and part pulls the airplane in the direction of the turn (the horizontal component of lift). You can use your imagination and visualize two separate and smaller forces making up the total lifting force. (There are those crazy arrows again. You will not see these on a real airplane, so enjoy them while you can.) The arrows represent the forces of lift.
Always remember that it’s the horizontal component that causes an airplane to turn—it pulls the airplane in an arc. Therefore, the larger the angle of bank, the greater the horizontal component and the quicker the airplane can turn.
Turns: Maneuvers You Can Bank On
Now that you know what makes an airplane turn, let me play the role of Socrates, the philosopher, and ask you an important question. (Don’t mind the bed sheet I’m dressed in. If, however, I show up wrapped in a mattress, that means we’re ready to practice landings.) The question is, “How do we tilt lift so as to make the airplane turn?”
The answer is, “With the ailerons.”
If you said, “With the wheel,” I promise not to have a heart attack. In fact, turning the wheel or deflecting the joystick (that is, banking the airplane using ailerons) is exactly how we tilt the total lifting force and start a turn.
To turn, deflect the joystick (when I say deflect, I mean to move it slowly to the right or left) in the desired direction of the turn and roll the airplane until reaching the desired bank angle. Then, return the joystick to its neutral (center) position, and the airplane usually remains established at this bank angle. If the airplane drifts from the desired bank, give the joystick a nudge or two to maintain the bank angle.
Let me roll myself up in that sheet and play Socrates again by asking, “From the inside of the cockpit, how can you tell how steeply you’re banking?” After all, you can’t have another pilot follow you around just to tell you what your bank is. Here’s a better way.
Figure 2-2 shows the attitude indicator that we learned about earlier.
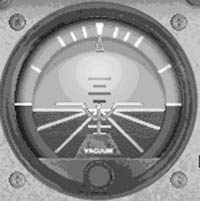
At the top of the attitude indicator, immediately to the right and left of center, are three white bank marks. Each mark indicates 10 degrees of bank, up to 30 degrees. Beyond the 30-degree mark are the 60-degree and 90-degree bank marks. To establish a 30-degree bank, roll the airplane until a white bank mark (the third one from the top) rests over the little orange triangle.
Not too tough, is it? But what if you want to bank at 15 or 45 degrees? Here’s how it’s done: Figure 2-3 shows two white diagonal lines angled downward from the middle of the attitude indicator.
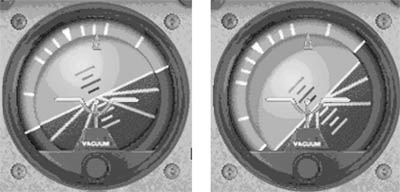
These are bank lines for 15 and 45 degrees of bank, respectively. If you roll the airplane to the right until the attitude indicator’s miniature airplane (the one with little orange wings) is parallel to the first diagonal line, as shown in Figure 2-3B, then you’re in a 15-degree bank. A 45-degree bank is accomplished by gently rolling the airplane until the miniature airplane’s wings are parallel to the second diagonal line.
Compensating for Gravity and Drag
Now there’s one more thing you need to understand before you’re ready to proceed to the Interactive Lesson on turns.
In aviation, it’s important to remember that you never get something for nothing. This is especially true when making turns.
Tilting the total lift force while in a turn means less lift is available to act vertically against the airplane’s weight (refer back to Airplane B in Figure 2-1). The airplane responds by moving in the direction of the momentarily larger force—downward, in the direction of the weight. We compensate for this by increasing our lift slightly whenever we enter a turn. This is done by applying a little back pressure on the joystick (that’s back pressure on the joystick, not pressure you generate on your back by digging your heels into the airplane’s carpet). Later on, you’ll understand that back pressure increases the wing’s angle of attack, thereby increasing the wing’s lift slightly. Unfortunately, this increase in angle of attack also increases the drag, which slows the airplane down. In a shallow-banked turn (somewhere around 30 degrees or less), this decrease in speed isn’t a concern. Steeper turns (45 degrees or more) may require the addition of power to prevent the airspeed from decreasing too much.
Let’s take a look at the attitude indicator again and see how we can use it to help us calibrate the amount of back pressure we will use when entering a turn.
Observe the position of the attitude indicator’s miniature airplane (especially the orange ball between the wings). In straight-and-level flight, the miniature airplane (and orange ball) rests almost directly over the artificial horizon line, as shown in Figure 2-4.

rests almost on
horizon bar in
straight and level flight
In a bank, however, it’s hard to identify the airplane’s pitch on the attitude indicator since the miniature airplane is no longer aligned with the artificial horizon line. Therefore, use the position of the orange ball in relation to the artificial horizon line as a pitch reference in a turn.
In order to hold altitude in a 15-degree and a 30-degree bank turn, you must slightly increase the airplane’s pitch. Figure 2-5 gives you a basic idea of how much this pitch must increase.
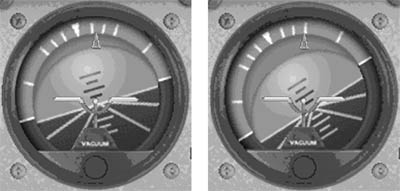
The point you want to remember is that steeper turns require an increase in pitch to maintain altitude. When rolling out of a turn back into straight flight, you must release the back pressure, thus reducing the pitch to that required for level flight. You’ll learn more about why we must increase the pitch in a turn in the upcoming section on slow flight. For now, when rolling into or out of a turn, make whatever pitch-up adjustment is necessary to maintain altitude. In steeper turns, be prepared to pull back a little more on the joystick to keep the VSI’s needle reading zero and the altimeter’s big (hundred-foot) hand steady. Use the orange ball’s position relative to the artificial horizon line to determine the airplane’s pitch while banked. And remember to lower the pitch when returning to straight-and-level flight.
Using the Rudder
The rudder is the moveable vertical surface located at the rear of the airplane. Its purpose is to keep the airplane’s nose pointed in the direction of the turn—not to turn the airplane! Remember, airplanes turn by banking. The rudder simply corrects for the forces that want to twist the airplane in a direction other than the direction it wants to turn (there are several forces that do this, but we won’t discuss them here. If you’d like to do a little extra credit, read the sidebar titled “Extra Credit: Adverse Yaw”).
Extra Credit: Adverse Yaw
Adverse yaw is the reason airplanes are equipped with rudders. When banking to the right, the aileron on the left wing lowers, causing that wing to lift up. While the lowered aileron increases the lift on the left wing, it also causes a slight increase in drag.
“Wait a minute,” you say, “I didn’t order any drag with my lift.” True, but this isn’t a pizza, either. Mother Nature always accompanies lift with a little drag—like a chaperone on a high school date (which would be a real drag).
In a right turn, the aileron on the left wing goes down to lift that wing. The wing rises, but the slight increase in drag pulls the left wing aft a little. This has the effect of pulling (or yawing) the airplane’s nose adversely to the left as the airplane banks to the right.
Obviously, if you’re banked to the right, you want the nose to point in the same direction you’re banking, don’t you? This is where rudders come in handy (although we use our feet to push on them). By keeping the ball in the inclinometer centered, you’re properly correcting for adverse yaw. In this condition, the airplane is being flown with the proper coordination.
Remember, adverse yaw affects the airplane as it rolls into or out of a bank. Therefore, more rudder pressure is needed when rolling into or out of a bank. Once you’re established in a turn, you often can neutralize the rudder and the nose should remain pointed in the direction you’re headed. (Later, you’ll learn about situations in which it’s necessary to keep a little rudder pressure applied in a turn.)
Flight Simulator comes with an Autorudder feature that keeps the nose pointed in the proper direction when making a turn. Therefore, if you don’t have rudder pedals, this simulated airplane will always fly coordinated. In other words, an appropriate amount of rudder will always accompany any aileron input. Of course, real airplanes don’t have an Autorudder feature (although some student pilots think of their flight instructor as the Autorudder). Therefore, if you decide to take flight training in an actual airplane, you’ll learn all about the rudder and how to use those pedals.
Of course, without rudder pedal hardware or a rudder joystick, you’ll most likely operate the airplane using the Autorudder feature. It simply makes no sense to deactivate this feature of Flight Simulator and let the airplane wobble all over the sky.
Using Rudder Hardware with Flight Simulator
Let’s suppose you opened your birthday present and found a set of rudder hardware for Flight Simulator. You lucky person, you! (Or, you might just have a joystick with the rudder function built in. Try twisting it!) It won’t be long after you hook it up that you stop and ask yourself, “Hey, when do I use the rudder?” One answer is, any time you use the ailerons (such as when you’re making a turn).
Think of a rudder as a vertical aileron located on the tail of the airplane. A right or left deflection of the rudder foot pedals changes the angle that the vertical stabilizer makes relative to the wind, causing the airplane to yaw about its vertical axis. This yawing motion keeps the airplane’s nose pointed in the direction of the turn.
Applying the right rudder pedal, as shown by Airplane A in Figure 2-6, forces the tail assembly to swing in the direction of lower pressure.
As the tail moves, the airplane rotates about its vertical axis. Application of right rudder pedal yaws the nose to the right. Applying left rudder pedal, shown by Airplane B, yaws the nose to the left (surprising, huh?).
If you don’t use rudder in a turn, part of the airplane will try to go in a direction different from the direction of bank. This is not a pretty sight, and your instructor’s eyebrows will rise so high that they will scratch his or her back. An easy way to remember this is: right turn, right rudder and left turn, left rudder. Feet and hands move together.
Now the question foremost in your upper-brain is “How much rudder is enough?” Good question. Figure 2-7 shows an inclinometer, also known as the ball, as a part of another instrument called the turn coordinator.
The little white airplane in the turn coordinator shows the direction of the turn, while the ball tells you if the proper amount of rudder is being applied. The ball is free to roll right or left within the glass tube. Any inappropriate rudder use (or lack of use) applies an unnecessary side force to the airplane. This deflects the ball in much the same way sunglasses scoot across your car’s dash when rounding a sharp corner. Your job is to keep the ball centered by using the rudder.
Figure 2-8 shows an airplane in a turn.
Airplane A’s nose is pointed outside the turn (probably because of insufficient right rudder or too much right aileron being applied). The ball and the airplane slip to the right, toward the inside of the turn. In other words, you need to point the nose slightly to the right for a precisely aligned turn. By adding enough right rudder to align the airplane in the direction it’s turning, the ball returns to the center, as shown by Airplane B.
Airplane C’s nose points toward the inside of the turn (probably because too much right rudder is applied or insufficient right aileron is used.) The ball and the airplane skid to the left, toward the outside of the turn. Adding a little left rudder keeps the nose pointed in the direction the airplane is turning and centers the ball.
Simply stated, if the ball is deflected to the right or left of center, add enough right or left rudder (respectively) to center the ball. Sometimes you’ll hear your instructor say, “Step on the ball!” This is simply your instructor’s way of telling you to add right rudder for a right-deflected ball or left rudder for a left-deflected ball. Don’t even think about placing your foot on the turn coordinator, or your instructor will question you about your SAT scores. Don’t put marbles in your shoes either.
When entering a turn, aileron and rudder are applied simultaneously and in the same direction. This is what pilots mean when they refer to “flying coordinated”. Aileron establishes the degree of bank, and rudder keeps the nose pointed in the direction of turn. If the ball is centered during this process, we say that the controls are properly coordinated.
You’ve done well so far. Click the Fly This Lesson Now link to practice what you’ve just learned.
In the next lesson, it’ll be time to progress to something uplifting, like climbs. I’ll also take you on a downer (a good one, that is) by teaching you how to make descents in the airplane.