Lesson 3: Climbs and Descents
In the fifth grade, my teacher asked me to come to the front of the class and name the parts of speech. I walked up, turned around, and calmly replied, “Lips, tongue, lungs, and oxygen.” Well, apparently that wasn’t the answer she was looking for.
Speech has its basic components, and so does aviation. So far, we’ve practiced two of the four most important fundamentals of flight: straight-and-level flight, and turns. Now it’s time to practice the final two: climbs and descents.
One of aviation’s biggest misconceptions is that airplanes climb because of excess lift. This is similar to believing that putting hand lotion in your airplane’s fuel tank will make your landings smoother, softer, and younger looking.
Airplanes climb because of excess thrust, not excess lift. Let’s return to the example of a car on the road to learn a little bit more about why this is.
A car traveling uphill is similar to an airplane in a climb. The only difference is that you (the pilot) choose the slope of the hill you climb. This is done using the elevator control that we discussed earlier.
On a level stretch of road, the maximum forward speed of the car with full power is 65 mph (Figure 3-1, Car A).
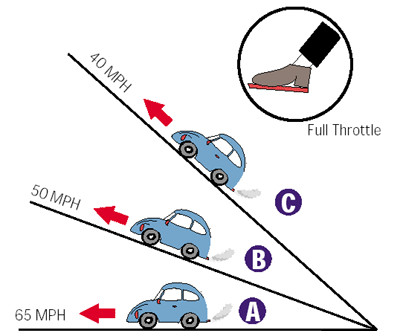
Even with full power, the car starts to slow down as the hill steepens.
As we move up a hill (Car B), the speed drops to 50 mph. An even steeper hill slows the car to 40 mph (Car C). The limited horsepower of the car’s engine simply can’t match the drag caused by wind resistance plus the rearward-acting weight as the hill steepens, so the car slows. A bigger engine or a redesign of the car to produce less wind resistance are the only options that could help this tired old machine climb the hill faster.
The same analysis works, up to a point, for an airplane attempting to climb a “hill” in the air.
Let’s say our airplane has a maximum speed of 120 mph in straight-and-level flight with full throttle (Airplane A in Figure 3-2).
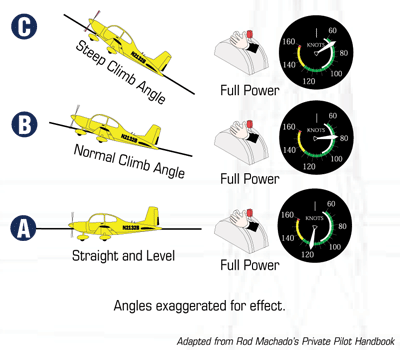
throttle (maximum power) the airplane slows down
as it attempts to ascend a steeper hill.
Pilots adjust their climb angle (hill size) by selecting
an altitude that gives them a specific climb airspeed.
Think of airplane throttles as being similar to automobile accelerator pedals, except that an airplane throttle is hand-operated; you push in for more power and pull out for less. Applying slight back pressure on the elevator control points the airplane’s nose upward (Airplane B). This causes the airplane to climb a shallow hill, and the speed decreases to, let’s say, 80 mph, just as it did in the car. Attempting to climb a steeper hill (Airplane C) slows our speed down to 70 mph. We can’t climb the hill we just selected faster than 70 mph because we don’t have the extra horsepower (thrust) to do so.
As we continue to steepen the angle of climb, our airspeed decreases further, just like the car’s speed did. Here, however, is where the airplane goes its own way from the car analogy. Airplanes need to maintain a minimum forward speed for their wings to produce the lift required to stay airborne. Ever wonder why airplanes need runways? Same reason long-jumpers do. Airplanes (and long-jumpers) must attain a certain speed before they can take flight.
This minimum forward speed is called the stall speed of the airplane. It’s an important speed that changes with variations in weight, flap setting, power setting, and angle of bank. It also varies among airplanes. (There’s no need to worry because later I’ll show you how to recognize when you’re near a stall.) As long as the airplane stays above its stall speed, enough lift is produced to counter the airplane’s weight, and the airplane will fly.
If the stall speed of Airplane C (Figure 3-2) is 60 mph, then climbing at a slightly steeper angle will result in insufficient lift for flight. We call this condition a stall. Done unintentionally, it leads to such primitive linguistic sounds as, “Uh-oh,” “Yipes,” and “Ahhhhh,” as well as, “I think I need to have my chakras balanced.” (Flight instructors have special biological filters installed that keep them from making these sounds on those rare occasions when you unintentionally stall the airplane.) Needless to say, in a real airplane, these sounds make passengers reluctant to ever fly with you again. This is why an upcoming lesson will be spent finding out about stalls and doing them (intentionally, that is).
What you need to know about stalls is that airplanes with a lot of power (like jet fighters) can climb at steep angles; those with limited power, however, must climb at less steep angles.
Knowing it’s extra thrust and not extra lift from the wings that is responsible for the climb allows you to draw some interesting conclusions. For instance, anything that causes the engine to produce less power prevents you from achieving your maximum rate of climb. Among the things resulting in less power production are high altitudes and high temperatures. Not applying full power for a climb is also another condition that gives you less power, but that’s a no-brainer, right?
At this point, you should be asking an important question. I certainly don’t mean questions of the Zen koan type, such as, “What is the sound of one cylinder firing?” or “If an airplane lands hard in the forest and nobody is there to hear it, does it really make a sound?” A good question for you to ask is, “How can I determine the proper size “hill” for my airplane to climb?” Let’s find out.
Airplanes have a specific climb attitude (steepness of hill) that offers the best of all worlds—optimum climb performance while keeping the airplane safely above its stall speed. You can determine the proper climb attitude for your airplane by referring to its airspeed indicator.
With climb power applied (usually full throttle in smaller airplanes), the pitch attitude is adjusted until the airspeed indicates the proper climb speed. In the Cessna Skyhawk SP Model 172 that we use in our lessons, we’ll use a speed of 75 knots for all our climbs. Sometimes, however, pilots climb at airspeeds slightly faster than 75 knots. No, they don’t do this because they want to get somewhere faster. They do it because it provides them with better over-the-nose visibility.
Raising the nose of the airplane results in a slower airspeed; lowering it picks up the pace. Where you place the nose—that is, the attitude you select or how steep you make the “hill”—determines what happens on the airspeed indicator. Unlike the ground-bound world, pilots decide how steep the hills in the air are going to be (within limits of course!). With just a little experience, you’ll be able to determine the correct size hill (nose-up attitude) by looking out the front window instead of having to rely solely on the airspeed indicator. When I was a student pilot, it seemed that any specific airspeed was the one place on the dial where the pointer never went. I was not gifted with much coordination as a youngster. My reflexes were so slow, I was almost run over by two guys pushing a car with a flat tire. I’m a living exhibit that one can be a competent pilot even without the coordination and reflexes of a 13-year-old Olympic gymnast.
目次
Descents
While engine power moves a car uphill, gravity pulls it down. Without your foot on the accelerator, the car’s downward speed is determined by the steepness of the hill it’s descending. The steeper the hill, the faster it goes. If the hill becomes shallower, then the speed decreases. If the hill becomes too shallow, then some power is necessary to maintain sufficient forward speed.
Airplanes can also move downhill without power (Figure 3-3).
Just lower the nose, and you’ll get what appears to be a free ride (it isn’t, but let’s not get into that). You can adjust the nose-down pitch attitude using the elevator control and descend at any (reasonable) airspeed you want.
You now have the answer to a question I guarantee every first-time passenger will either ask or want to ask you: “What happens if the engine quits?” The airplane becomes a glider, not a rock.
Unlike climbing, you may elect to descend within a wide range of airspeeds. There are, however, many factors to be considered, such as forward visibility, engine cooling, and the structural effects of turbulence on the airframe. (All of these items are discussed thoroughly in my Private Pilot Handbook, which is available from my Web site. You can get directly to it using my link on the Flight Simulator Partners page.)
However, during the last portion of the landing approach (known as final approach), you should maintain a specific airspeed. Usually, this speed is at least 30 percent above the airplane’s stall speed. When preparing to touch down, excess airspeed or erratic control forces often lead to difficulty in making a smooth landing (it’s also the reason pilots make good-humored fun of one another).
Beginning a Climb
Flying is no fun if it’s all talk and no action. So let’s take a look at the actions involved in entering a climb. Let’s assume that your airplane is in straight-and-level flight at cruise power with an airspeed of 100 knots. Entering the climb requires that you raise the nose to climb attitude and simultaneously add climb power. After all, it makes sense to get the airplane up in the air as fast as is reasonable to take advantage of favorable winds and the better view (among other reasons). So in the Cessna 172, you’ll always add full power to climb. Then, you’ll apply enough nose-up trim to hold the airplane in this attitude.
As soon as you begin raising the nose, you’ll notice that the airspeed drops and the vertical speed indicator begins to show a climb. This is one sure sign that you’re climbing. When the people on the ground start to look like ants, that’s another clue (unless you’re really looking at ants).
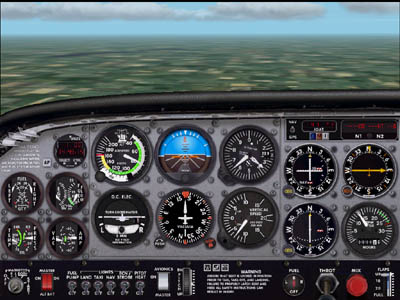
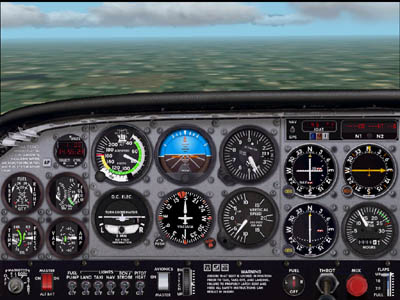
Figure 3-4 shows the airplane climbing at 85 knots and 500 feet per minute.
You’re on Your Way Up
Engineers (not the kind that drive trains) tell us that our Cessna 172 climbs most efficiently at 74 knots. Since the airplane in Figure 3-4 is at 85 knots, how do you get the airplane slowed down to 74 knots while continuing to climb at full power?
The answer is to raise the airplane’s nose (increase the steepness of the hill you’re climbing) to a slightly higher climb attitude. Hold it there, and watch the response on the airspeed indicator. Adjust the pitch up or down slightly until the airspeed indicator shows 74 knots (75 is okay, too). Be patient; airplanes have inertia and take a moment or two to settle into a new speed once the pitch is changed.
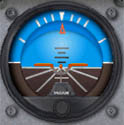
To maintain a 75-knot climb speed, you should show a pitch of approximately 13 degrees on the attitude indicator, as shown in Figure 3-5.
(For now, we’ll use the attitude indicator for our pitch and bank reference since it’s difficult to see the real horizon over the instrument panel in a flight simulator.) The attitude indicator’s vertical calibration lines are worth five degrees each, so you read them (from bottom to top) as 5, 10, 15, and 20 degrees of pitch. Thirteen degrees of pitch would be just below the third line up.
Of course, the pitch for a climb may vary slightly. All that matters, however, is that you find the proper pitch that gives you the climb airspeed you want.
Care to Waltz?
Now you know the secret to climbing an airplane. Therefore, the next time you want to climb, follow this procedure: Raise the nose to approximately 13 degrees pitch-up on the attitude indicator, add full throttle, and trim the airplane to maintain this attitude. It’s as simple as that. Then, adjust the pitch slightly (perhaps only a degree or two) to give you the airspeed you want. Think of entering a climb as a three-step waltz. Think: one, two, three… one, two, three… or attitude, power, trim (unfortunately, when I waltz, between every count I’m constantly saying, “Oops, sorry about your feet.”). Change the attitude, change the power, then trim the airplane once it’s stabilized at its new attitude.
Of course, you may elect to climb at a slightly faster speed. This often makes it easier to look over the instrument panel (so I can see and avoid other airplanes). When a rapid, efficient climb to altitude isn’t necessary, find the airspeed that gives you both a good climb rate and a reasonable view over the panel.
What Goes Up…
If you keep climbing, you’ll eventually climb out of the atmosphere, right? Not really, but you still need to know how to get down (and I don’t mean learning to dance, either).
Think of descending in an airplane as you would going down a hill in a car. First, as the car points down a steep hill, you normally take your foot off the accelerator and coast downward. The steepness of the hill determines the car’s eventual speed. Steep hills result in faster coasting speeds, while shallow hills result in slower coasting speeds. Airplanes work similarly.
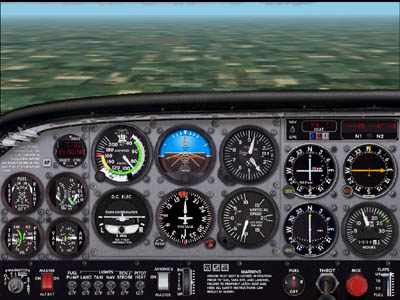
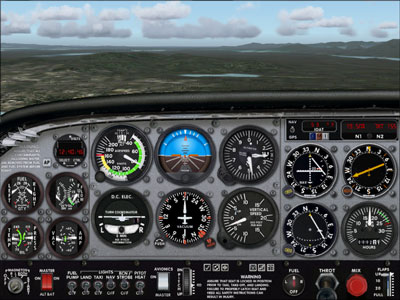
Figure 3-6 shows an airplane with the power reduced to flight idle.
In a sense, this airplane is coasting down a hill. The airspeed is stabilized at 80 knots in this figure. Now, let’s change the steepness of the hill.
Pitch Change Means Airspeed Change
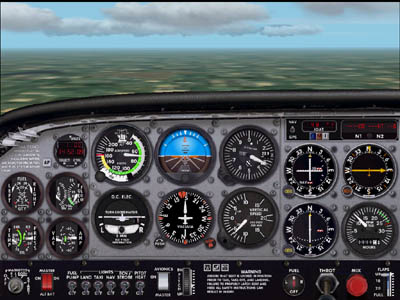
Let’s see how a small change in pitch affects the airspeed. Without readjusting the trim, if you lower the nose slightly (make a steeper hill), you’ll find an attitude that produces an airspeed reading of 90 knots. Do this by referring to the attitude indicator. By making a slight pitch adjustment—perhaps one-half of a degree, one degree, or even two degrees—and holding it, you’ll notice the airspeed increase.
Eventually, the airspeed will indicate 90 knots and the attitude indicator will show a pitch attitude similar to that shown in Figure 3-7.
If you want to descend at this speed, trim the airplane to maintain this attitude.
If you were to raise the nose (make a shallower hill), you would find an attitude that produces an airspeed reading of 70 knots. Figure 3-8 shows the attitude needed to produce this airspeed.
This is how you should control the airspeed during a descent. Raise or lower the pitch attitude using the vertical calibration on the attitude indicator. Make a small change, and watch the result. Remember to be patient as the airplane slowly changes its speed.
Controlling your airspeed by adjusting your pitch this way is important, especially as you prepare for a landing. After all, you’ll need to fly at different speeds when making your landing approach. By making changes in pitch, you can descend at any airspeed you want. Just remember to use trim to maintain the airplane at the desired attitude and thus, the desired airspeed.
Okay, you’ve talked me into it. Let’s talk just a bit about changing descent rates.
Changing Descent Rates
What if you want to descend at the same airspeed but at a slower descent rate (a smaller reading on the VSI)? Well, here’s your chance for power. (Sorry, I mean engine power. No world domination today!) Power has a direct bearing on your rate of descent.
At 80 knots, with the power at flight idle, the airplane descends at approximately 700 feet per minute (fpm), as shown in Figure 3-9.
Suppose, for example, you’re approaching to land and need less of a descent rate to make it to the runway. What do you do? Increase your power to a higher value, say 1800 revolutions per minute (rpm), and adjust the pitch slightly to maintain 80 knots. Retrim if necessary.
Your instruments should look like those in Figure 3-10.
With this slight increase in power, the airplane descends at 300 fpm. Of course, as more power is added, the airplane will stop descending. If you give it even more power, the airplane will fly level or even start climbing at 80 knots.
At this stage of your training, it’s a good time to agree on how you’ll control the airplane. Power (throttle position) should be your means of adjusting the rate of descent (what the VSI reads). The airplane’s pitch attitude (controlled by the joystick) is your means of maintaining a specific airspeed. In a climb, you’ll always use the maximum allowable power (usually full throttle) while adjusting the airplane’s attitude using the joystick for the airspeed desired. Since you’re familiar with the procedure for making climbs and descents, let’s combine these with the skills we developed in Lesson 2.
Reading the Altimeter
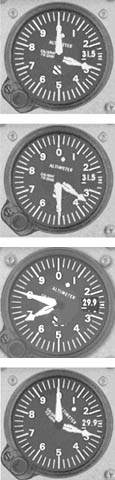
Figure 3-14 shows a typical altimeter found in most airplanes.
It has two hands, and a dot that representing the airplane’s height in tens of thousands of feet. The shorter, thicker hand represents altitude in thousands of feet. The long, thin hand represents the airplane’s altitude in hundreds of feet.
The easiest way to read an altimeter is to read it just like you would a clock. For instance, if Altimeter A in Figure 3-14 were a clock, what time would it read? Yes, it would read 3 o’clock. Since Altimeter A isn’t a clock, it shows an altitude of 3,000 feet. The long (hundreds) hand points to zero hundred feet, and the medium (thousands) hand points to 3,000 feet.
If Altimeter B were a clock, what time would it say? It would read 3:30, or half past 3 o’clock. As an altimeter, it reads half past three thousand, or 3,500 feet. The long (hundreds) hand points to 500 feet, and the medium (thousands) hand points to between 3,000 and 4,000 feet. Thus, the altitude is 500 feet past 3,000 feet (3,500 feet).
What time would it be if Altimeter C were a clock? It looks like it would be somewhere around a quarter to seven. More precisely, the long (hundreds) hand shows 800 feet, and the medium (thousands) hand points a little shy of 7,000 feet. Therefore, the altimeter reads 800 feet past 6,000 feet (6,800 feet). Not too tough, is it?
Try reading Altimeter D like a clock. What time is it? Yes, it looks like it’s 3:00, but take a closer look at the very small dot. This dot points a little past a value of 1, meaning you need to add 10,000 feet onto the value shown by the altimeter’s medium and long hands. Thus, Altimeter D indicates an altitude of 13,000 feet.
Things Are Turning Up
Suppose we want to combine climbs and descents with turns. Specifically, let’s examine how to enter a 20-degree right-banking turn while established in a climb, then roll into straight-and-level flight. Here’s how you might do it.
First, establish the climb. Increase the pitch to a 13-degree nose-up attitude, as shown in Figure 3-11, add full power, and then trim.
Then, you’ll roll into the desired bank. The secret here is to use the attitude indicator’s orange ball as the pitch reference. Since the orange wings won’t be aligned with the horizon, use the orange ball as a pitch reference, and use the attitude indicator’s orange pointer as the bank reference.
When climbing (descending, too), it’s best to begin leveling off when you’re within 50 feet of your desired altitude. A 50-foot lead helps prevent overshooting or undershooting the target altitude. If you want to level off at 4,000 feet, then enter level flight when you read 3,950 on your altimeter. At this point, you’d lower the nose and roll out into a straight-and-level flight attitude.
Yes, the power is still set at maximum, and that’s good. Let the airplane accelerate to cruise speed (unless you specifically want to fly at a slower speed). Then reduce power to a cruise setting of approximately 2,200 rpm.
Once the airspeed stabilizes, trim for this attitude, as shown in Figure 3-12.
Well, that’s how you do it. Believe it or not, that wasn’t necessarily a simple maneuver. Remember, the secret to going from one attitude to another (such as from straight-and-level flight to a climb) is to do it like a waltz: one, two, three… Attitude, power, and trim. You adjust the attitude to a known value that puts your airplane in the ballpark for a climb (13 degrees for a climb at 80 knots). Then you adjust the power (you’ll climb with full power in our lessons’ airplane). And finally, you provide enough trim to hold this attitude. The formula of attitude, power, and trim is the secret when making any pitch change.
Time for a Turn Down
Suppose you’re flying at 4,000 feet and want to descend to 2,500 feet while in a left turn at 20 degrees of bank. To make this maneuver a little more challenging, do it at 90 knots. Here’s how it’s done.
First, you roll into a 20-degree turn to the left. Then, you reduce power to flight idle. (Flight idle is the condition where the throttle is pull aft to its stop and the engine produces idle power.)
Next, you lower the nose to an attitude that you suspect gives you an airspeed of 90 knots. (You’ll notice that when you reduce power, the nose will automatically want to lower on its own. Therefore, you’ll probably have to apply a little back pressure on the joystick to keep it from descending too quickly.) Since 3 degrees positive (upward) pitch gives you 80 knots, perhaps you attain 90 knots at 1 degree positive pitch (a slightly lower attitude). Remember, because you’re in a turn, you use the attitude indicator’s orange ball as the pitch reference, as shown in Figure 3-13.
When you’re at 2,550 feet (a 50-foot lead above 2,500), put the airplane in the attitude for straight-and-level flight. Then, you increase power to a cruise setting of 2300 rpm, and trim when the airspeed stabilizes. Attitude, power, and trim, right?
Now you know how to make climbs, turns, and descents, as well as perform straight-and-level flight. Yes, you understand the basics. Now you need practice. I’m cutting you loose to practice. Click the Fly This Lesson link to practice what you just learned.
Our next lesson deals with flying at slower speeds, just like the speeds you’ll fly at during a landing approach. You’ll learn all the little things that allow you to get it down on the runway.
Click the Fly This Lesson Now link to practice what you’ve just learned.
The Pinwheel Effect
A child’s pinwheel spins as a result of the air blowing on it. In case you haven’t noticed, airplane propellers are nothing more than big pinwheels for big kids. The pinwheel effect is responsible for rpm (revolutions per minute) values that change from their preset positions as the airspeed changes. For instance, whenever you set the throttle to a new rpm value, the rpm reading will change as the airplane’s airspeed changes. Why? The propeller reacts to changing airspeed like a pinwheel reacts to wind. This spins the prop artificially fast or prevents it from spinning to its full potential until the airspeed stabilizes. This often requires resetting the rpm once, or perhaps twice, to achieve the final setting you want. The pinwheel effect is associated with fixed-pitch propellers (which is the kind like the one on the airplane that we use for our lessons). Later on, you’ll learn about constant-speed propellers that change their pitch to maintain a specific rpm.